//
A fun Nasa at Home Activity
Date: 08/02/2023
ENGINEERING A ROVER
Continuing the NASA at Home initiative, try building a rubber-band-powered rover that can scramble across your room. Rovers are car like spacecrafts NASA uses to explore the surfaces of other planets.

NASA plans to land astronauts on the moon by the year 2024. The astronauts will need mooncars - called rovers - to drive across the moon’s surface, carry supplies, help build their outpost, and explore the area. Today, you’ll build and test a rubberband-powered rover.
This is a prototype of a rover, just like the one you are going to build. Prototypes are used all the time in engineering. They give you a basic design to build, test and evaluate. Once you understand a design’s strengths and weaknesses, you can then find ways to improve it. Today, for example, as you test your rover prototype, you’ll find ways to make it work better. Improving a design based on testing is called the engineering design process.
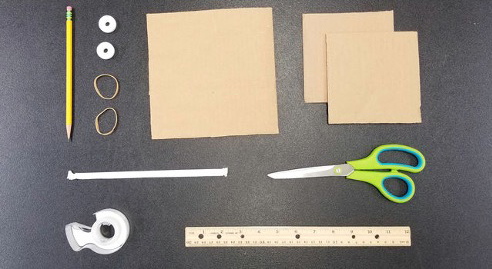 Corrugated cardboard body (6-inch/15-cm square)
- 2 corrugated cardboard wheels (5-inch/13-cm square)
- 1 sharpened round pencil
- 2 rubber bands
- Ruler
- Tape
- 2 round candies (the hard, white, mint ones with a hole in the middle)
- 1 plastic drinking straw
- Scissors
1. Make the rover body
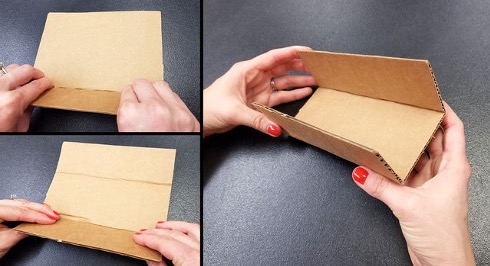 Fold the cardboard into thirds along - not across - the corrugation (the open side the piece of cardboard), pushing up the sides of the rover body to form a trench. Each section will be about 2 inches (5 cm) across.
2. Make the front wheels
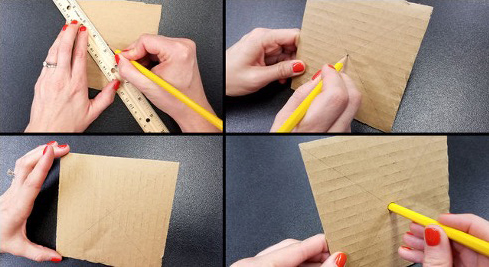 On the two 5-inch (13-cm) cardboard squares, draw diagonal lines from each of the corners, forming an 'X'. Poke a small hole in the center with a pencil, where the lines cross.
(Avoid accidentally poking yourself with the pencil. Keep your hands away from where the pencil will go through the cardboard.)
3. Attach the rear axle and wheels
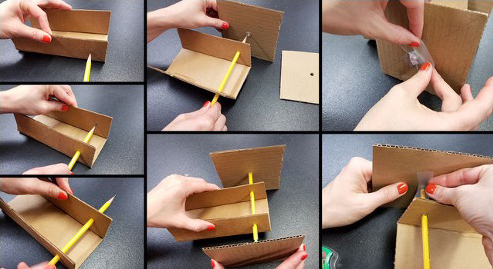 Use a pencil to carefully poke a hole near the top of each of the two outer most sections on the rover body. Again, keep your hands away from where the pencil will go through the cardboard. Make sure the holes are directly across from each other and are big enough for the pencil to spin freely. This is where your axle will go.
Slide the pencil through the axle holes. Carefully slide the cardboard wheels onto each end of the pencil and secure them with tape.
4. Make the front axle and wheels
Tape the straw across the bottom of the rover body on the opposite side from the pencil.
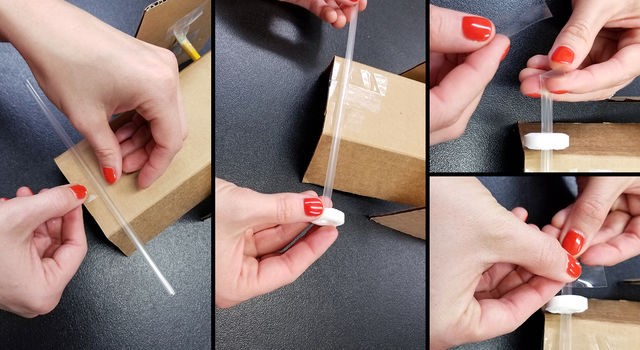 Slip a candy onto each end of the straw. Bend and tape the ends of the axle to stop the candies from coming off.
5. Make a rubber-band chain
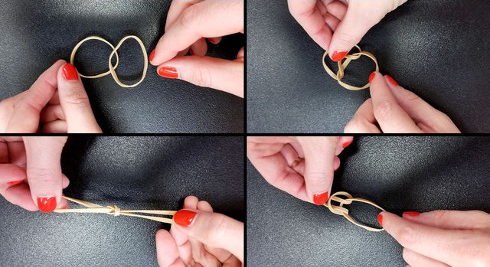 Create a chain with the two rubber bands as shown in the image.
6. Attach the rubber band
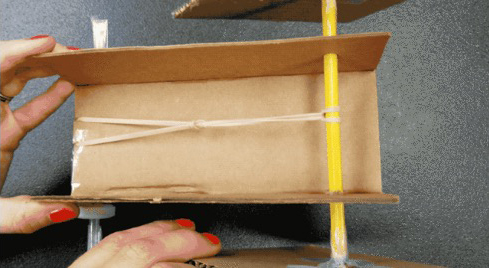 Loop one end of the rubber band chain around the pencil, as shown in the image. Cut small slits into the front end of the rover body. Slide the free end of the rubberband chain into the slits.
7. Ready, set …
Turn the back wheels to wind the rubber band around the axle and power up your rover.
Go ahead and give it a go.
Once done upload your pictures or videos on your social networks.
Don’t forget to tag us @EduVoyage #EduVoyage #NasaAtHome
Visit NASA at Home to update yourself with the latest and greatest information of our universe in this quarantine season.
EduVoyage, a specialised division of ITL World - Travel Management Company, caters to the intricate requirements of student enrichment travel takes students to such facilities in countries including USA, Russia, Belgium, Kazakhstan, Singapore and Turkey.
Check out our space camp experiences.
Copyright © 2026 by EduVoyage